Saturday, April 30, 2011

May Day Baskets: The Ultimate Icebreaker

New in town? Don't know your neighbors very well?

May Day baskets are your ultimate icebreakers to get to know the people around your neighborhood better! Plus, this is not just for your neighbors! Take a special trip around town to deliver these to your family or friend's doorstep. I guarantee it will make their day :)


A little May Day history:

  • The tradition of the ancient Roman and Druid holiday of May Day has endured for centuries. It has been a celebration of spring turning into the pleasures of summer!
  • Festivities focused mainly on the "Maypole" in which ribbons are woven around by groups of dances to make beautiful designs and patterns.
  • Rounding up flowers became a tradition and "bringing in the May" became a popular event on May1st. 
  • Giving baskets came later in the festivities of May Day, but now is tradition.
  • Remember...you can give a May Day basket throughout the entire month...it doesn't have to be the first ;)
Today May Day baskets are given anonymously at someone's doorstep or hooked over the handle or knob.

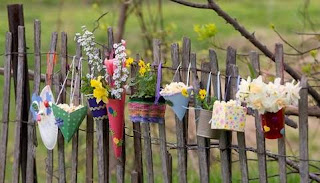
Here is my version of a cheap but chic May Day basket:


You will need:

  • 1 gallon empty milk jug & piece of cardboard (your recycle bin)
  • Ribbon (Hobby Lobby $2.00)
  • Glue Gun, Sticks, & Scissors (My Essentials)
  • Assorted Bag of Brushes (Hobby Lobby $4.99)
  • Acrylic Paint (Hobby Lobby $0.53)
  • Tissue Paper (Target $1.00)
  • Paper-hole Punch (Target 1.00)
1. First and most important step is to wash out empty milk jug very well! Wouldn't want someone's May Day basket smelling like rotton milk ;)

2. After it is somewhat dry grab your scissors and begin to cut at the opening following it down to the handle.


3. When you reach the handle begin to cut horizontally.


4. TA-DA! There's your basket, now time to decorate!


5. Take the acrylic paint and squeeze onto cardboard. Dip brush into the paint and apply to milk jug.


6. Let it dry (20 mins) and then apply another coat if needed. 

7. After it is dry the next step is to put holes in the sides with the paper-hole punch.


8. Push ribbon through the outside hole into the basket and tie into a knot. Repeat to the other side as well and then cut ribbon if happy with length.


9. Plug glue gun in and then when it warms up apply the ribbon around the outside. 


10.  To cover up the not-so-pretty inside I just glued tissue paper down!


11. Now the really fun part, fill up the basket!
Here are some ideas:
  • Flowers are the traditional choice. Can be fresh, silk, or seed packets.
  • Baked goods, especially homemade ones.
  • The more personalized the better :)
Here is how my turned out!


Since my neighbor is a close friend to me I chose a more personalized style of basket. I filled it up with a homemade set of stationary, flower seeds, and initial wall decor! My finishing touch was this:

A little history behind May Day!

Happy May Day and as always wishing you creative bliss!

Happy May Day! :)


Friday, April 22, 2011

Crackin' Me Up

Easter is one of my favorite holidays and I was so excited to be able to make and decorate these:


If you are having guests over or need a basket filler then this Easter craft is for you!

Materials Needed: 


  • Mod Podge (The Essentials)
  • Paper Mache 6" Egg ($1.47 Hobby Lobby)
  • Sponge ($1.00 for a whole bag of them-Dollar Tree)
  • Assorted Patterned Paper (The Essentials)
  • Old surface to work on
Don't have a Hobby Lobby near by? Use this website to make the egg: How to Paper Mache.

With your materials in hand you are now ready to get crackin' with your egg!

1. Put down your old surface to work on and begin tearing the patterned paper into many different sizes.


2. Take the sponge and dip it in the mod podge. Apply a thin coat onto the egg and grab a piece a paper. Place the piece of paper on top of the mod podge. After paper is placed apply a coat over the paper. 


3. You will repeat step 2 over until your egg is covered. 


4. After the egg is all covered with paper you can set it up right and let it fully dry (might take 20 minutes).  


5.  You're Done! Enjoy :)


Here is what I did with the eggs I made:

Decoration on our mantle
Can you tell which one my husband did? ;)

Easter gift!

~Wishing you creative bliss and a blessed Easter!


After the Sabbath, at dawn on the first day of the week, Mary Magdalene and the other Mary went to look at the tomb. 
There was a violent earthquake, for an angel of the Lord came down from heaven and, going to the tomb, rolled back the stone and sat on it. His appearance was like lightning, and his clothes were white as snow. The guards were so afraid of him that they shook and became like dead men. 

The angel said to the women, “Do not be afraid, for I know that you are looking for Jesus, who was crucified. He is not here; he has risen, just as he said. Come and see the place where he lay. Then go quickly and tell his disciples: ‘He has risen from the dead and is going ahead of you into Galilee. There you will see him.’ Now I have told you.” 
So the women hurried away from the tomb, afraid yet filled with joy, and ran to tell his disciples. Suddenly Jesus met them.“Greetings,” he said. They came to him, clasped his feet and worshiped him. Then Jesus said to them, “Do not be afraid. Go and tell my brothers to go to Galilee; there they will see me.”

~Matthew 28:1-10

Be on the lookout next week for...MAY DAY Baskets!

My lovely husband (Ryan) displaying
next week's May Day Basket!


Monday, April 18, 2011

April Showers Bring May Flowers!

It must be that spring rain that is making me want to decorate everything with flowers lately! I love real flowers, but I can't justify spending the money to have fresh ones filling the vase everyday.

So, I gave myself a $10 budget and put my creative mind to work!
A couple hours later I came up with this:


If you like what you see then here are the following steps to creating a vase full of flowers that will never wilt!

Supplies Needed:


  • Spray Paint ($4.99 Hobby Lobby)
  • Ribbon ($2.00 Hobby Lobby)
  • Check around your home for an empty glass bottle, I found an empty Izze bottle in my home (free)
  • Scissors or floral cutters (had part of my essentials)
  • Glue gun with glue sticks (had part of my essentials)
  • 3 Floral Stems ($1.00 each Hobby Lobby)
With the supplies collected you are now ready to begin crafting!

1. To begin, you first want to take the label off your glass bottle and rinse it out.

2. Let it dry out, then set up an area were it is well ventilated; find some old paper bags/newspapers/magazines and lay them out.

3. After the glass bottle is dry and your area is set up you can begin to spray paint. Have you never spray painted before? Check this helpful website out: How to spray paint glass and more!

4. One coat should be enough :) Then let it dry for about 30 minutes.


5.  
Plug in the hot glue gun and cut three pieces of ribbon (pieces should cut to around 9 inches but will depend on size of glass bottle).


6. Begin to hot glue the first piece of ribbon where the body of the bottle starts. Next, glue the second piece right under the first piece. Follow the procedure with the last piece (keep glue gun plugged in for last step). 


7. Almost done! Chances are your stems are going to be too long and will need to be cut down to size. You can choose to have your stems to be all the same length or have some variety in length.  With variety use your floral cutters/scissors to cut, starting at the bottom of the stem, tallest floral 9 inches, middle 10 inches, and shortest 11 inches off the stem. Place in vase to see if you are happy with lengths.

8. Last step! Glue the floral stems in your vase starting with the shortest. Apply glue to the bottom of the stem, place in vase, and repeat with the other two (may have to hold flower down for 30 seconds before release).


9. Well almost last step ;) ADMIRE your new vase full of flowers! 


Stay tuned this week for my Easter craft: Crackin' Me Up 


~As always wishing you creative bliss!