Sunday, May 29, 2011

Antique Jar Lanterns

With summer approaching we are bound to be spending some time outdoors! Whether it is camping or just chilling in the backyard these Antique Jar Lanterns will simply add that mood lighting you were looking for!


I originally found the tutorial for this on Make It Do It. They used these lanterns for wedding decorations, which is an awesome idea! Here are the supplies and steps I took to make these Antique Jar Lanterns!

Supplies I used:


  • Vineyard Wire (2 .50 Hobby Lobby)
  • Pen/Pencil
  • Votive 
  • Rocks, Sand, or Decorative Glass Gems
  • Mason Jar or Recycled Glass Jar
  • Pliers 
  • Spray Paint (Optional)

Steps to making Antique Jar Lanterns:

~(Optional Step) If you want to give your jars some color add a touch of spray paint! That's what I did to my recycled glass jars. Spray and let dry.


~Start here if you are skipping optional step :)

1. Measure out about 3 feet of wire and cut. From the end of the wire measure 8 inches in, cut, and then wrap twice around pen/pencil. Remove pen/pencil.


2. Grab the wire and wrap it under the large lip of the jar. Take pliers and twist wire until secure.


3.  With the rest of the wire take and put it through the hole and then twist upwards (to make the handle for the lantern). Use the pliers to secure both sides.


4. After everything is nice and secure fill the lantern with rocks, sand, or glass gems!


These look great both indoors and outdoors!


~Wishing you creative bliss~

Wednesday, May 25, 2011

Whimsical Branches

This past weekend Ryan and I made it up to Cherokee, Iowa to visit his family. We relaxed, ate some great food, and of course crafted! I think 75% of the time Lisa (mother-in-law-), Liz (Ryan's brother's girlfriend), and I were crafting! This was one of our favorite crafts featured from Two Girls Being Crafty. We of course added some of our own flair to this craft by using old vases/recycled glass bottles to put these whimsical branches in!


Here are the supplies we used:

  • Scrapbook Paper
  • Scissors
  • Glue Stick & Glue Gun
  • Cardstock OR any type of Cardboard
  • Floral Wire
  • Branches
  • Vase 
Optional: 
  • Spray Paint
  • Old Vase OR Recycled Glass Bottle
  • Ribbon 


Instead of going out and buying a vase we looked around the home for old vases/glass bottles. We also found some spray paint and ribbon that we could use to give this craft the "wow" factor!


This is how we made our whimsical branches:

1. Begin to cut a plethora of "leaves" with the scrapbook paper. Depending on how full you want your branches to be will determine the size of your leaf pile ;)


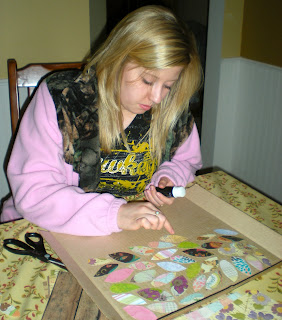
2. Grab the cardstock/cardboard, because glueing is the next step! We used the top of an empty pizza box and with a glue stick glued the leaves on that.

Look at Liz go! ;)
We also thought that the pizza box with leaves could be cute as wall art.
Another craft idea . . . I think so!
3. After they are all glued you can start cutting them! 


4. Plug the hot glue gun in and cut the wire 3"-5"long.


5. The wire will now be hot glue gunned to the backside of the leaves.  

Be careful when using the hot glue gun!
Safety first :)

6. Here is the fun step! Arrange the branches in the vase, and then start to wrap the wired leaves around them.

Liz arranging her branches!


7. Fill those branches up until they run out! Then you're done!!!

Lisa's vase displayed in her home :)

Liz's Final Product! 

Mine that I absolutely adore :)
These are cute gifts . . . and of course great home decor :)


Be on the lookout later this week for DIY Outdoor Lanterns!


~Wishing you creative bliss~


Sunday, May 15, 2011

From Nothing Into Something

Life gives us so many opportunities to turn nothing into something. My husband and I got the chance to do this with our little efficiency apartment! The first time we looked at our place we knew that it needed a fix-me-up. We were ready for the challenged and signed the lease! With a little bit of paint, some help from my mom and mother-in-law, and a couple trips to Hobby Lobby we turned this nothing into something we call our home! :)

Here are the before AND after pictures:

  • Bathroom:

  • Bedroom/Living Room:


  • Area between bedroom, kitchen, & bathroom:


  • The Kitchen:


It was all worth it! Even after all the painting, Hobby Lobby trips, and staging the furniture. Throughout this summer I will be sharing my secrets into turning your nothings into somethings! 

~Wishing you Creative Bliss~

Thursday, May 5, 2011

Aromatherapy: What your Mom needs this Mother's Day

Homemade Reed Diffuser Vase


Working at Yankee Candle I have seen many different forms of aromatherapy. One of these is the amazing reed diffusers. The reed sticks shown in the picture above soak up oil (which is put into vase) and diffuse a fragrance.

This Sunday give your mother the gift of aromatherapy and a homemade reed diffuser vase! I did it under a budget of $15.00!
Supplies needed: 
  • Mod Podge, Patterned Paper, & Paper Trimmer (The Essentials)
  • Glass Bottle  (recyclable bin)
  • Sponge to apply Mod Podge (Dollar Tree)
  • Yankee Candle Oil Refill ($9.99)
  • Yankee Candle Reed Diffuser Sticks ($2.99)
Here are the steps that I took to make the vase:

1. Cut patterned paper into strips


2. Apply Mod Podge with a sponge on the glass bottle. Wrap the strip of paper on the glass bottle. Apply a layer of Mod Podge on top of the strip. (You will have to cut strips to fit your glass bottle, especially towards the bottom)


2. Repeat step 1 until the glass bottle is covered with paper.

Back Side

Front Side
3. Towards the bottom I did cut squares so they would fit to the shape of the bottle.


4. Let the bottle fully dry, and then you are ready to gift it!

5. Here is what it will looks like displayed:

Front Side
Back Side

Happy Mother's Day to all the wonderful mom's out there :)
Especially mine!
Love you Mom!

My mother & I :)

I remember my mother's prayers and they have always followed me. The have clung to me all my life.
~Abraham Lincoln 


~Wishing you creative bliss~