Thursday, July 28, 2011

DIY Charming Petal Mirror

When I stumbled across the DIY craft on The Art Annex I was ecstatic to get the materials and begin this charming petal mirror!


Materials Used:


  • Flower Petals (Dollar Tree $1.00 each)
  • Tacky Glue ( Hobby Lobby $2.47)
  • 2 pk Mirrors (Hobby Lobby $3.99)
  • Sharktooth Picture Hanger (Hobby Lobby $1.29)
  • Cardboard, Box Cutter/Scissors, Aluminum foil, & Buttons (Already Had)
How I made it:

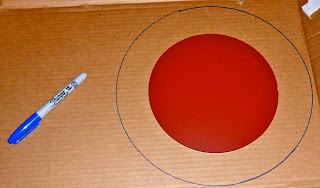
1. To do the outline of the mirror you will need something round, so I went the the kitchen and grab a plate to trace. Trace the plate onto the cardboard and follow with tracing the mirror (centering it inside where you traced the plate). 


2. Use the box cutter/scissors to carefully cut around the plate traced part. Then pour some tacky glue on a scrap of aluminum foil. Begin dipping the rose petals (whatever color you want on outside) into the tacky and place in the outside ring.


3. Continue to fill the outside ring until full OR if you want to start with another color of petal.  


4. I glued on my yellow petals until it reached the mirror outline. At that point I was ready to glue my mirror on. I took the tacky glue and placed it on the back of the mirror and then in the outline. I let the mirror set in place for 24 hours to make sure it was secure.


5. I decided to outline the mirror and off set the petals by gluing on buttons (since I love them & had some extras).


6. Hanging this charming piece is the last step! I nailed the sharktooth piece into the backside of the cardboard, and then found a place on the wall to display it. :)


Can't wait to hear success stories of this DIY craft :)

~Wishing you creative bliss~


Tuesday, July 26, 2011

Live. Laugh. Breckenridge.

When summer started the countdown was on for Ryan & my summer vacation. Of course, it couldn't be a vacation without some other family members involved! So, my parents picked us up along the way :) This year's summer destination was Breckenridge, Colorado!


Loaded up with our suitcases (mine may have been a little overpacked...just maybe ;) we were ready to begin our nine hour drive up to Breckenridge!


Our road trip was filled with laughter, some good jams, and some napping (except for the driver ;) After the nine hours passed with a couple of pit stops, we finally arrived to Breckenridge. 

For the next four days we would be sharing a lodge not only with my parents, but also with my mom's extended side of the family...The Whipple's (it almost seemed like a family reunion)! 


The lodge sure filled up quickly as aunts, uncles, cousins, and second cousins arrived! The lodge was beautiful, secluded, and spacious! It was so gorgeous there we didn't want to come back to Omaha :) During the four days visiting we hiked, shopped, and had a vicious pool tournament. 


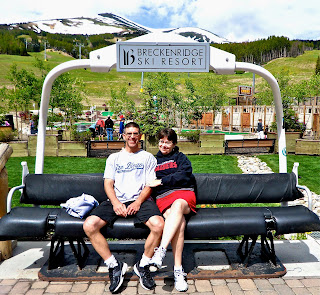
First day there we: rode the Gondola Lift up to Breckenridge Ski Resort and hiked around. Above is a picture of my hubby Ryan & Me :) Below is one of my lovely parents. Aren't they adorable? Love them!


Second Day: Ryan loved the hiking...could you guess what I liked??? The shopping! :) Breckenridge had the cutest shops to browse around in! This one was my favorite...Magical Scraps! Check out their site Magical Scraps. I would LOVE to have a shop similar to this!


Third Day: The day was full of hiking and shopping but when the evening hit it was time for the 1st Annual Whipple Pool Tournament! I honestly did want to participate because I am horrible at it, but everyone insisted so I gave in to the peer pressure ;)

The teams were put together randomly and you never guess who I was with...my husband! We didn't win the tourney, but we had a really fun time trying! This pool tournament just reminded me of how blessed I am to have a wonderful family who loves to laugh and have a fun time!


Fourth Day: Finished up some shopping and did a little walking before we made the trip back home :(


Our vacation in Breckenridge was AMAZING. We were so blessed to be able to spend it with the people that care about us the most...family :) Hope everyone is having a super duper summer!

~Ryan & Briana~

Sunday, July 17, 2011

Hootie Cutie

It's been awhile since I posted, but I have a good excuse...I was in Colorado on vacation!!! Yes it was very difficult to leave beautiful Breckenridge, but I guess I had to come back to reality sometime ;) I will post about my trip later, so for now lets talk baby shower gifts.

So, this post is all about two gender neutral baby shower gifts I have made up. The main tutorial featured today is dressing up a plain onesie & bib into a shower gift that everyone will give a hoot about :)


But before we get to that lets talk about the first gift...baby room wall art! In my Oh My Buttons I began making a shower gift that I was going to reveal in this post.

Here is the craft half finished ;)


And finally....the finished product (that took me a three hours to complete)!

Train up a child the way he should go.
Even when he is old he will not depart from it.
~Proverbs 22:6

Want to make one? Follow the tutorial Oh My Buttons and instead of using the initial as your focal point use other shapes such as this heart. I also added a bible verse from Proverbs 22:6 (with some scrapbook paper and mod podge) that I believe every parent should go by :) Don't you think this piece will make a great addition to a baby's room? 

Okay now we are to the main tutorial!


What I used:
  • Creations by Grace white bib & onesie (Hobby Lobby $7.00)
  • Iron On Felt Owl (Hobby Lobby $1.99)
  • Glue Gun & Glue Sticks (My Essentials)
  • Bag of Buttons (Hobby Lobby $4.99)
Step-by-step:

1. I found my iron and put it on the right setting to iron the owl onto the onesie. Once it is warm enough, place the owl where you want it to be. Run the iron over it for about 1 minute. Repeat that to the onesie as it is inside out. 


2. Here comes the fun part! Pick out some cute buttons and place them on the onesie wherever you like! I used my glue gun to attach the buttons, but if you have the patience then sewing works too.


3. On the bib you may put whatever your heart desires, but I wanted to make the onesie & bib a set so I put... HOOT!  :) Again, I didn't have the patience & time to sew the buttons on, but if you do go for it!


4. Finished! The only additional step I took was to make sure that with the set it says that it should be "hand washed" (just because I did glue the buttons on). If they were sewed on then I wouldn't worry about it :)


Happy Crafting!
~As always wishing you creative bliss!~


Friday, July 1, 2011

Americana Wreath & Garland

Wow! The 4th of July is approaching so quickly! Need last minute decorations??? Got you covered :)

Here is the wreath I decorated:

Best part about the stars . . .
they are used out of recycled cereal boxes!

Here are the materials I used:

  • Grapevine Wreath ($2.00 Hobby Lobby)
  • Acrylic Paints ($3.00 Hobby Lobby)
  • Ribbon ($1.00 Hobby Lobby)
  • Foam Brush, Scorer, Writing Utensil, Scissors, Wire, Glue Gun (My Essentials)
  • Newspaper, Cereal Boxes ( My Recycle Bin)

The main decoration I made on the wreath is the Americana Stars. Here are the steps I took to make them:

1. I first made a star cut out to trace on cereal boxes. Then I traced as many stars as I could on the cereal box and cut them out.


2. After the stars are cut out I did something which is called scoring. With the little scoring utensil start from the middle and work your way around all the five points. After you are done scoring the stars bend at each line to make them pop up!


3. When all the stars are scored you can start painting the stars! I only did one coat to give it more of a vintage look :)


4. Now we are going to create a way the stars will stay on the wreath. Grab the wire and cut as many pieces you need for as many stars you have. Mine was about 2 inches in length. Make sure the stars are dry and then flip them all over to apply hot glue to the back of them. Place the piece of wire in the hot glue (be careful). :) 


5. Arrange the stars on the wreath and then twist the wire on the "sticks" of it so they will stay in place. 


6. For my finishing touch I wrapped some glittery gold ribbon in the wreath. I love it! Looks great on our front door :) 


Now for the Garland. 

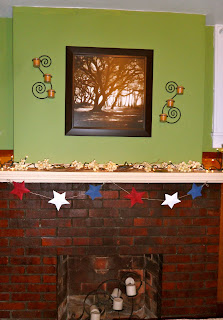
I had a couple stars left over and so I decided to make some garland! All you need for this is some string/twine and the hot glue gun :)

Measure the length you want for your garland and then cut it. Turn the stars over on the back side and place a dot of glue on them. Take your stars (with the glue on them) and place them wherever you want them to sit on the string/twine. 


Then when your satisfied with how full your garland is...DISPLAY IT! :)


Have a safe and Happy 4th of July! :)

~Wishing you creative bliss~