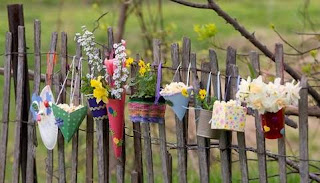
May Day baskets are your ultimate icebreakers to get to know the people around your neighborhood better! Plus, this is not just for your neighbors! Take a special trip around town to deliver these to your family or friend's doorstep. I guarantee it will make their day :)
A little May Day history:
- The tradition of the ancient Roman and Druid holiday of May Day has endured for centuries. It has been a celebration of spring turning into the pleasures of summer!
- Festivities focused mainly on the "Maypole" in which ribbons are woven around by groups of dances to make beautiful designs and patterns.
- Rounding up flowers became a tradition and "bringing in the May" became a popular event on May1st.
- Giving baskets came later in the festivities of May Day, but now is tradition.
- Remember...you can give a May Day basket throughout the entire month...it doesn't have to be the first ;)
Today May Day baskets are given anonymously at someone's doorstep or hooked over the handle or knob.
Here is my version of a cheap but chic May Day basket:
Since my neighbor is a close friend to me I chose a more personalized style of basket. I filled it up with a homemade set of stationary, flower seeds, and initial wall decor! My finishing touch was this:
Here is my version of a cheap but chic May Day basket:
You will need:
- 1 gallon empty milk jug & piece of cardboard (your recycle bin)
- Ribbon (Hobby Lobby $2.00)
- Glue Gun, Sticks, & Scissors (My Essentials)
- Assorted Bag of Brushes (Hobby Lobby $4.99)
- Acrylic Paint (Hobby Lobby $0.53)
- Tissue Paper (Target $1.00)
- Paper-hole Punch (Target 1.00)
1. First and most important step is to wash out empty milk jug very well! Wouldn't want someone's May Day basket smelling like rotton milk ;)
2. After it is somewhat dry grab your scissors and begin to cut at the opening following it down to the handle.
3. When you reach the handle begin to cut horizontally.
4. TA-DA! There's your basket, now time to decorate!
5. Take the acrylic paint and squeeze onto cardboard. Dip brush into the paint and apply to milk jug.
6. Let it dry (20 mins) and then apply another coat if needed.
7. After it is dry the next step is to put holes in the sides with the paper-hole punch.
8. Push ribbon through the outside hole into the basket and tie into a knot. Repeat to the other side as well and then cut ribbon if happy with length.
9. Plug glue gun in and then when it warms up apply the ribbon around the outside.
10. To cover up the not-so-pretty inside I just glued tissue paper down!
11. Now the really fun part, fill up the basket!
Here are some ideas:
- Flowers are the traditional choice. Can be fresh, silk, or seed packets.
- Baked goods, especially homemade ones.
- The more personalized the better :)
Here is how my turned out!
| A little history behind May Day! |
Happy May Day and as always wishing you creative bliss!
 |
| Happy May Day! :) |


: ). I wish I was your neighbor!
ReplyDelete